CW Pileup Story and Tips

It happened so fast it was over before I knew it.

I had about ten minutes to kill before I had to eat dinner and scoot to my monthly Central New Hampshire Amateur Radio Club meeting. Moments before I had raced up to my shack to drop off some 1-cent stamps for my QSL cards.

I jumped on 20 meters and went to 14.050. Nothing. Deader than a doornail.

I went up to 14.055 and had the same results. My CQs were like trees falling in the forest.

No one was listening, or if they did hear me, there was no pathway back to my zepp dipole 80/6-meter antenna.

I decided to give 40 meters a shot.

I tuned my antenna and was 1:1. Sweet.

After tuning to 7.058, same thing. Nothing. I was beginning to think everyone was eating dinner.

I gave it one last chance at 7.050.

CQ CQ CQ DE E W3ATB W3ATB K

Seconds later I hear someone tuning up.

Bingo. Even though I’ve only been doing CW for four months, I knew what was coming. This guy or gal was cracking his/her knuckles getting ready to come back.

I send out: CQ DE E W3ATB K

Immediately, I hear back:  N1EFX

Cool! I’m going to get this QSO in.

He sends his call one more time, then KABOOM!

All of a sudden, I hear three maybe four other operators pounding my call sign.

GULP! What do I do now?

N1EFX was trying to transmit, but I could hear nothing as the frequency was jammed tighter than two 16d sinker nails driven into a 1/4-inch concrete hole at the same time.

I panicked. How could I answer all of them? What should I do?

I did the stupid thing and turned off my rig thinking it was some ferocious animal that was going to bite me.

But as I was exiting the shack, I let out a huge Yahoo! and the grin on my face must have been wider than the 405 in west LA.

Down the steps I went and proceeded to make a quick salad with turkey cubes and croutons. I inhaled it and sailed out the door headed to my meeting.

Once in route, I turned on my 2M Yaesu 8900-FT and called to see if by chance my mentor, Jim Cluett – W1PID, would be listening.

“W1PID this is W3ATB calling.”

“W1PID”

“Jim, can I call you in about ten minutes? I’ve got a story that I’m sure is going to make you laugh.”

“I’m driving now and can’t talk. I’m headed to the meeting.”

“Oh, okay, I’ll just talk to you there.”

Well that’s rare. Jim usually doesn’t go to the meetings, but then it dawned on me that tonight the topic was D-STAR and Jim is just getting into that part of the hobby.

I get to the meeting and just a few are there. Jim had beat me and was standing alone looking at his cell phone.

“I’ve got to meet with Adam for a few minutes, then I’ll catch up,” I said.

“Sure.”

Jim is a man of few words most of the time. I can’t say as it’s a bad policy.

Once Adam helped me see if my new multimeter was accurate, I cornered Jim.

“Guess what happened?”

“Did you try to transmit and your antenna was down?”

“Oh no, I had my first pileup. It was amazing. I had no clue what to do so I shut off the radio.”

I fully expected him to break out laughing.

Nothing. Stone face.

Hmmmm, I wonder if his blood sugar is low?

“Well, pileups are normal. Did you at least get any portion of one of the operator’s call signs?”

“Oh yes, I got the first guy out of the chute, N1EFX.”

“Well, all you had to do was wait till the commotion died off and then call him back. The others would step aside and wait to work you once you finish up.”

And there you have it. The words of wisdom of W1PID dispensed matter-a-factly.

Now I know what to do and I can’t wait for my next pileup baby!

Morse Code 6 WPM Alphabet and Punctuation

Here’s a quick demonstration of Morse Code at 6 words per minute (WPM).

I just cover the alphabet and a few punctuation marks in this video.

Your takeaway should be that it’s not too hard to learn Morse code.

Years ago to get your novice license, you just had to be proficient at 5 WPM. That’s even slower.

My mentor, Jim Cluett – W1PID, told me that the test lasted five minutes and you had to copy perfect code for a minute straight at any point during the five minutes.

With a little practice you can do that. If you want to hear Morse code at different speeds, just go to the ARRL page that updates new Morse code practice MP3 files on a routine basis.

My First QRP QSO

It was a warm, sunny, 70 F-degree day in Sin City on January 22, 2014.

I’ll remember the day, the place and everything around me just like that night in my father-in-law’s basement where I stole the first kiss from my wife.

You may think I’m nuts, but traveling 2,731 miles with all my tiny radio equipment to make a QRP QSO for the first time will do that to a fellow. QRP is a Q-sign acronym that’s used between radio operators asking if they should reduce power. It’s loosely used among a small group of ham radio operators that prefer to transmit at power levels of 5 watts or less.

Once you do that, say transmit at 1 watt and the signal goes thousands of miles and is heard by another operator, you can get hooked. Anyone can blast a signal at 50, 100 or even 500 watts. What’s the challenge of that?

A QSO is another Q-sign acronym that stands for a completed two-way communication between two radio operators.

Just six weeks before I received in the mail a used, but in mint condition, HB-1B quad-band transceiver. It’s a dandy little radio that allows you to do ham radio from inside your home, on top of a mountain or anywhere in between. This little rig is compact, easy to operate and rugged.
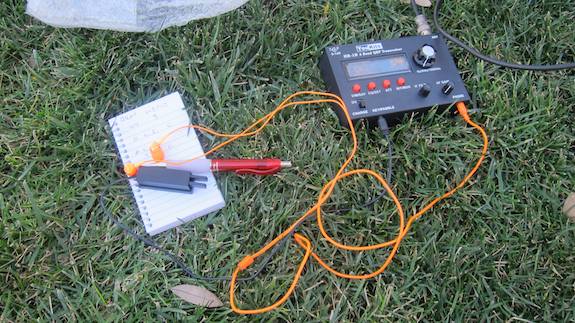
You can see the HB-1B in the upper right corner. It's a superb transceiver. Photo Credit: Tim Carter 2014

You can see the HB-1B in the upper right corner. It’s a superb transceiver. Photo Credit: Tim Carter 2014

My mentor, Jim Cluett – W1PID, got me hooked on outdoor radio months before. I lusted being able to do what he does each week when the weather cooperates. He specializes in QRP outdoor radio and since I love being outdoors too I was immediately attracted to this aspect of ham radio.

“Guess what? I’m going to the World of Concrete show and I’m going to take my HB-1B rig with me,” I mentioned to Jim about a week before I left for Vegas.

“Would you want to try to do a QSO with me?”

“Sure.” Jim’s a firm believer in less said is better. He’s a master at many things including wry humor and masking his true emotions. Every now and then I’m able to break through his defenses and something I say or do elicits an extended belly laugh.

We agreed that I’d scout a location once there and let him know when I’d be set up and on the air. I was to arrive in Vegas on Tuesday afternoon around 1:30 p.m PT and my afternoon and evening were booked solid with a media event put on by Bosch Tools. They were hosting my visit to the show and I was honored and excited about seeing their new tools.

Because of the three-hour time zone shift, I knew I’d be up long before dawn the next morning. Sure enough, I popped out of bed at 4:05 a.m. PT. The only reason I wasn’t out of bed at 3 a.m. was because I had stayed up until about 10:30 the night before attending the private dinner put on by Bosch Tools. I was pretty tired having been up for almost 21 hours.

My plan was to scout the pool area at the Mirage casino/resort where I was staying, but it didn’t open until 10 a.m. I had to be at the convention center by 9:15 a.m. so that was out.

My HB-1B, the roll of microcord to hoist up the antenna, my endfedz multi-band thin-wire antenna, headphones, etc. were all in a nice compact tupperware container ready to stuff into my backpack. My Pico paddles were in their own small plastic box to protect the precision tool.

Bosch Tools had given me the day before a welcome bag filled with goodies including a 16-oz bottle of Fiji water. That’s exactly what I needed to get my microcord up into a tree to pull up my antenna. I was ready to roll!
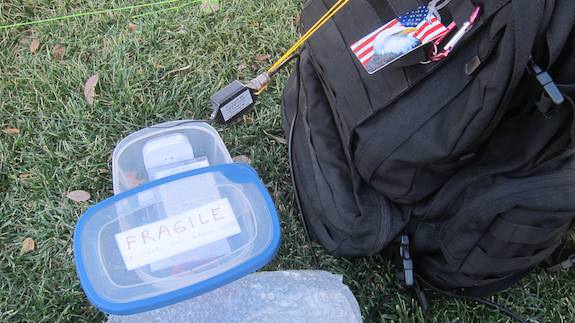
Here's the tupperware container that held everything except my Pico paddles. Photo Credit: Tim Carter 2014

Here’s the tupperware container that held everything except my Pico paddles. Photo Credit: Tim Carter 2014

I had some business to attend to at the Las Vegas Convention Center, the site of the World of Concrete show. Around 3 p.m. I was finally able to get on the air.

The only trees I could locate that might work were these bushy ones near the covered walkway that lead from the South Hall to the overhead monorail mass-transit train that stops at the convention center. This was not ideal because so many people were walking past me. Fortunately temporary chain-link fencing separated me from them.
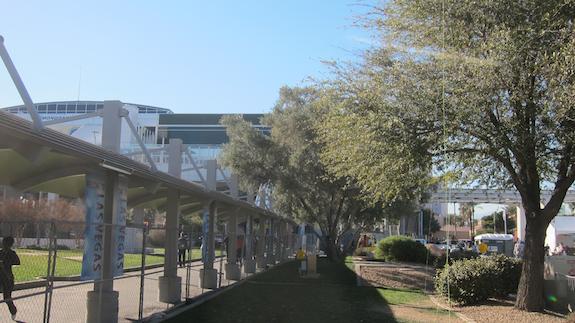
Here's where I set up. The convention center is behind me about 150 feet away. You can see my lime-green microcord draping in the tree. Photo Credit: Tim Carter

Here’s where I set up. The convention center is behind me about 150 feet away. You can see my lime-green microcord draping in the tree. Photo Credit: Tim Carter

It was time to set up. I unpacked all my gear and got ready to throw the 1/3-full Fiji water bottle over the tree. I didn’t do so well. After three attempts, my bottle was snagged by the newly named Tree of Death. The bottle was not coming down without a chainsaw.
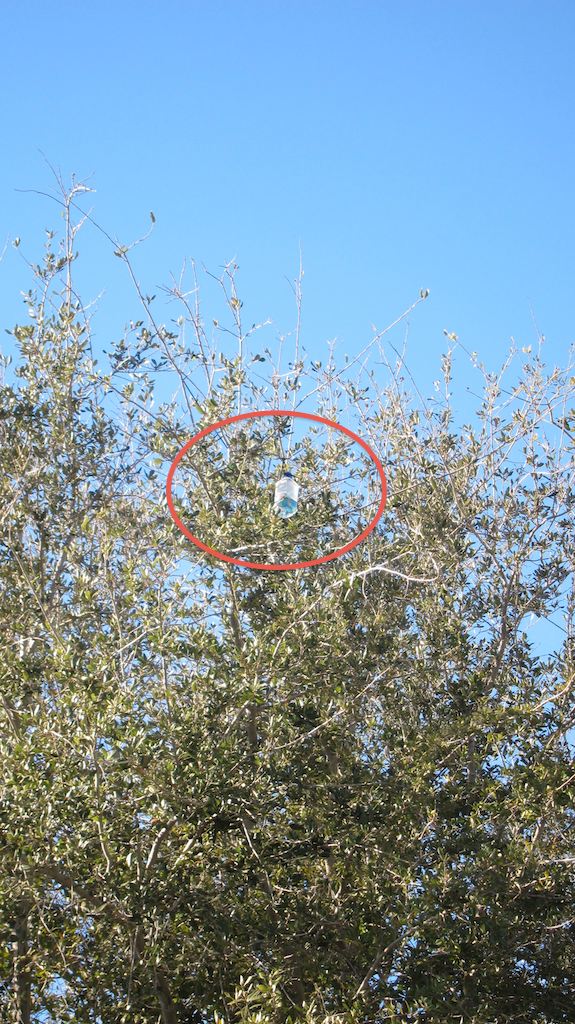
You can see the bottle stuck in the tree in the red oval. Time for a rock. Photo Credit: Tim Carter 2014

You can see the bottle stuck in the tree in the red oval. Time for a rock. Photo Credit: Tim Carter 2014

Fortunately I had tied the microcord rope loosely to a larger diameter parachute cord and I was able to get my microcord back out of the tree. I looked for a rock and promptly tied the cord to it and whipped it up into the tree. I was able to tug on the microcord and get the rock to drop to the ground.

In a few moments I had my endfedz multi-band antenna up in the tree. It was by no means perfect because I was hesitant to pull it too close to the branches of the Tree of Death. I could see how the antenna could be snagged with ease.

I was left with a pathetic sloper antenna that had the shape of a rough question mark. I was convinced my antenna would not work well. Jim had told me time and again I’d get the best results if the antenna was straight up and down. Well, that’s not happening today for me.

After connecting the antenna to the HB-1B, it only took a few minutes to connect my earphones and my sweet Pico micro paddles to the rig. I feel it’s mandatory to have the antenna connected to the radio before powering it up. I don’t want to risk transmitting by accident without the antenna to absorb the energy.

I had the radio set to 20 meters and went to 14.050. I had texted Jim about 15 minutes earlier telling him I was close to being on the air. He texted back asking me where I’d be on 20 meters. I originally sent 14.050. He was already in his shack waiting for me.

It was a little noisy so I scooted down to 14.045. I quickly texted Jim telling him to move to that frequency.

I was filled with excitement. Would he hear me? Could I hear him? Would the band be open? Did I have enough power to make it back to New Hampshire where he was sitting in his shack?

It was time for my first QRP outdoor QSO.

I transmitted: “W1PID DE W3ATB K”

A second later I heard, “RR  3ATB DE W  PID K”

OH MY GOSH! IT’S WORKING!

His signal was faint and I was only catching about 60% of his transmission as the signal faded in and out. But I was HEARING him! How cool was that? What are the chances we’d both hear each other?

I was transmitting at 4.5 watts and he was blasting out at 75 watts to try to get to me.

I gave him a 449 RST and he gave me back a 449, or at least that’s what I was able to extract from the the ether.

I then heard him send in the fading signal,  O  L  D    C. Later on the phone he told me he sent: COLD COLD COLD because it was bitter cold back home.

Here's my small log book with the contents of the short QSO. You can see the small Pico paddles too. Photo Credit: Tim Carter 2014

Here’s my small log book with the contents of the short QSO. You can see the small Pico paddles too. Photo Credit: Tim Carter 2014

That fast it was over. But I HEARD HIM!

I was bubbling with joy. It was worth all the effort and risk. After the QSO was over, Jim called me on my cell phone. He was as excited as I was because he knows far more about ham radio than I do and realized it was simply amazing we could complete the QSO.

“It’s not uncommon for just one person to hear the other and the other hear nothing. It’s all a matter if that HF radio pathway is open,” Jim said.

He summed it up perfectly when he said matter-of-factly, “It’s all magic.”

Indeed it is – and that’s part of the attraction as far as I’m concerned. You never know who you’ll connect with and what might happen.

Jim told me before we hung up on the phone he was afraid he’d have to bail me out of jail as the convention center police might think I was some sort of terrorist. I was prepared with my wallet-sized copy of my FCC license, but even still in these times one never knows.

I can’t wait for the weather to break here in New Hampshire so I can get outdoors more often to operate the HB-1B. Fortunately I’ll be in sunny southern California the second week of February, 2014 on business.

I’m taking the HB-1B and all my gear. I plan to operate from a few mountain tops and from the beach of the Hyatt resort at Huntington Beach. A friend I’m visiting has his kite all ready to get my antenna up in the air at the beach and possibly on the mountains!

I hope you and I can do a QSO soon! Be sure to ask me if I’m QRP.


HB1B QRP Radio Audio and Sound Output

I purchased a used HB-1B Four Band CW QRP Quad-Band transceiver in December of 2013. It was in mint condition.

Today I finally got to spend some time with the little rig. I was trying to figure out how to switch between the internal speaker and the headphones.

The distributor of the HB-1B, Ten-Tech has a video of the HB-1B on YouTube where they run through all the features of the magnificent radio. The video is embedded below and you can clearly hear audio emanating from the radio at 4:09 in the video. I urge you to watch the video.


Because the HB-1B does NOT have an internal antenna tuner, I turned on my ICOM-7000, went to 20 meters, and tuned my zepp di-pole 80/6-meter antenna so I had a SWR of 1.5. The band was very active. There were more di’s and dah’s spewing from my ICOM-7000 than water from a 2-inch fire hose at a three-alarm fire.

I removed the antenna cable from the ICOM-7000 and connected it to the HB-1B with a BNC adapter. I turned on the HB-1B and nothing. No sound came from the radio even though the LCD display was showing plenty of voltage and everything was fine. I plugged in my Bose earphones and I could clearly hear all sorts of QSOs in progress.

I unplugged my headphones hoping to hear sound and nothing, even though the 20-meter band was lit up brighter than Jupiter on a clear December night. Nothing.

NO SOUND was coming out of the radio. Dang it, was the speaker broken?

I looked for a switch. Nothing.

Finally, I got out the simple two-page manual. Nothing. Not a thing about how to switch between the earphones and speaker. GRRRRRRRRRR….

Guess what? The HB-1B has NO INTERNAL SPEAKER!

The folks at Ten-Tech that taped the video obviously had a small external speaker – you can see the green jack in the lower right corner of the rig when you watch the video – connected to the rig.

If you don’t want to use earbuds or a small headset and want to have audio others can hear while you operate, you’ll need to purchase a small speaker you can plug into the phone jack at the lower right corner of the handsome HB-1B.

Did this blog post help you?

I invest time writing and taping videos to help other hams like you save time and lower their blood pressure. Frequently equipment manuals are lacking key details that cause frustration. I’m trying to fill in those gaps when I can.

If this post saved you some frustration, I’d appreciate it if you’d consider making a simple donation – even just a buck – using the PayPal button below. The more donations I receive, the more time I can devote to helping you.

Thanks in advance.


Ham Radios and the TSA

Have you wondered if it’s okay to take ham radio equipment on commercial airplanes? Will the TSA confiscate the radios from your checked luggage or after they scan them in your carry-on luggage?

Guess what, as of December 2013, it’s not an issue, even though the radios, antenna wires, and other gear might look very suspicious. An over-zealous TSA agent may think you’re a terrorist. But you should do the following to ensure you have no problems on your trip and your expensive gear does not get damaged.

I decided to write about this because in February of 2014 I’m planning to go to southern California for a media event. I write a nationally syndicated newspaper column, AsktheBuilder.com, and I have a weekly newsletter that goes out to about 100,000 consumers. Behr Paints, the house brand of Home Depot, is hosting a 40-hour event spaced over three days to bring the media up to speed on all new things about Behr Paints. I’m lucky to get the invite. Many want this, but few are chosen.

Because I have close friends in this part of California, I always try to spend a few more days in the area visiting and recreating. I plan to do just that on this trip, and one day will be spent hiking and doing CW QSOs from a SOTA summit if at all possible.

Here’s a video I made during this California trip trying to do a SOTA activation. I was just learning CW and my code speed was just above 7 WPM. It’s funny to look back on those days!

Just a few days ago I received in the mail a used – but in brand-new condition – HB-1B multi-band QRP radio. It’s a beauty. I plan to take it and my Yaesu VX-7R HT with me on the trip along with all needed gear.

I rarely check luggage as I travel light. I plan to carefully pack all my radio gear in a translucent sturdy food storage container. I’ll pack all the things so they’re not rubbing against one another. The container will protect the gear and keep them waterproof.

I’ll also carry a laminated copy of my FCC license. I plan to make copies of the front pages of the owner’s manuals of the rigs so a TSA agent can see the rigs are radios and not explosive devices. One never knows!

If you decide to put your radios in checked luggage be aware a TSA agent may unpack them for inspection, but she/he MAY NOT repack them with the care required to survive the torture of luggage abuse. Think about taking your radio gear in carry-on luggage where you control its destiny.

If you decide to put your gear in checked luggage, be sure to place a note in with the gear explaining what it is, how FRAGILE it is, and a copy of your FCC license. This should allow your gear to make it with you to your final destination.

Good luck! I hope you have as much fun with your radio equipment on your next business or pleasure trip as I plan to do. Come back here to look for stories about me and my traveling radio gear!

Did this blog post help you?

I invest time writing and taping videos to help other hams like you save time and lower their blood pressure. Frequently equipment manuals are lacking key details that cause frustration. I’m trying to fill in those gaps when I can.

If this post saved you some frustration, I’d appreciate it if you’d consider making a simple donation – even just a buck – using the PayPal button below. The more donations I receive, the more time I can devote to helping you.

Thanks in advance.


Building the MFJ QRP Cub 20 Meter Transceiver


CAVEAT: This is not going to be a huge step-by-step article telling you the process I went through to build the MFJ QRP Cub 20-meter transceiver. It’s an article I decided to write to help bolster your confidence to start and finish this project.

If you’ve never been around electronics – that’s me – and your eyes glaze over looking at all the tiny components of different shapes, sizes and colors on a green circuit board, then you’ll keep reading. I was terrified of even thinking of working with electronics.

But guess what? I did it! I have a working MFJ QRP Cub 20-meter transceiver! But here’s the news: I didn’t do it alone. Nor should you the first time if you’ve never built any electronics.

What’s QRP you ask? It’s a q-signal used in amateur radio to communicate that one should reduce power. There’s an entire branch of amateur radio that desires to communicate around the world using LOW POWER – 5 watts or less. I’m part of that group and these tiny radios by MFJ or other manufacturers are just that. They’re designed to operate on LOW POWER.

I don’t know what got you interested in building your own radio, but for me it was seeing a Morse code demonstration given by two seasoned operators in front of a group of young Boy Scouts. I was intrigued by the Morse code, but MUCH MORE SO by the radio they were using.

It was an MFJ QRP rig that looked like it was used as a prop on the Star Wars or some other modern space-age science fiction movie.

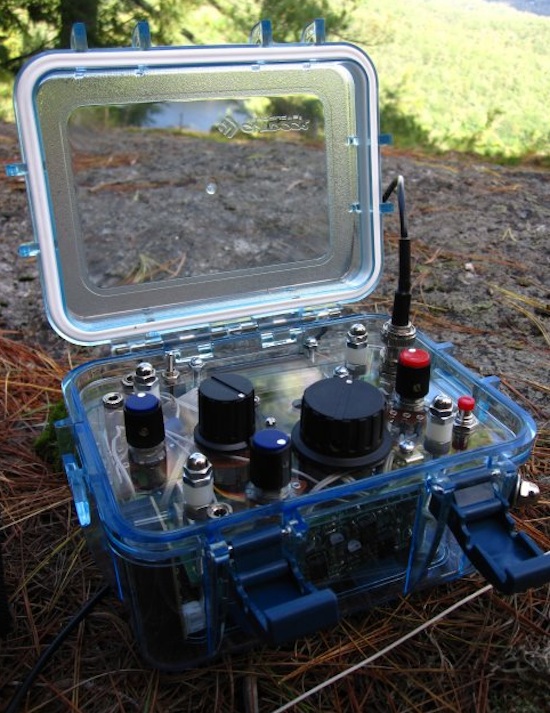
It was the COOLEST RADIO I’d ever seen. This radio was in a clear plastic waterproof box and was completely self-contained. The battery was built in. The touch keyer was built in – two tiny acorn nuts on the lower outside corner of the box!

The cool LCD frequency display was built in. All you had to do to operate was open the lid, connect your antenna and flip the tiny on/off switch.

MFJ QRP Cub Transceiver Radio

Here it is. This is the radio Hanz Busch built using the MFJ QRP Cub Transceiver. This particular radio was for 80 meters, not 20. The circuit boards, I believe, are nearly identical. Photo credit: Hanz Busch, W1JSB

All I could think of in that room is, “I WANT ONE OF THOSE RADIOS AND I WANT TO LEARN MORSE CODE!!!”

That was my inspiration to build a radio from scratch. First and foremost, you need some internal passion driving this project or it will languish on your bench. You’ll give up. Tap into that passion now.

Jim Cluett – W1PID and Hanz Busch – W1JSB

I was lucky. You need to find your luck via an Elmer. Jim Cluett – W1PID is my Morse code mentor. He’s a member of the same club I belong to – Central New Hampshire Amateur Radio Club.

He’s also built countless radios over his 50 years in the hobby. I’ve only been really active in amateur radio the past 30 months – and most of that is in public service work. Read some of the other stories here on my blog about that including the one about me working at the Boston Marathon the day the two terrorist brother bombers killed and maimed many.

The day after the demonstration in front of the Boy Scouts I called Jim.

“Jim, I really want to build one of those radios I saw last night. I also want to learn Morse code. What’s the next step?”

“Contact Hanz. He’ll help you build the rig. Start practicing code 10 minutes a day using the Koch Method.”

Jim’s very stingy with his words, but not his wisdom. He’s as good a mentor as you’ll ever find. Jim Cluett is selfless. We need millions more Jim Cluett’s in this world.

I reached out to Hanz Busch – W1JSB and he said he’d help me build a radio just like his. Jim suggested I go with a 20-meter rig because that band is very open in the daytime and I’d be using the QRP rig out in the field on hikes to make QSOs. You can use the rig you build inside your warm and dry home, but my desire is to use it hiking and doing SOTA contacts.

Soldering Irons and Toroids

I went to MFJ Enterprises and purchased the MFJ-9320K kit radio for 20 meters. When it arrived, it was like Christmas morning. I really had no idea about what was in the kit, especially the SIZE.

It was SMALL! The little metal case they provide to house the radio was about three inches square and two inches high! That’s pretty tiny.

Hanz came over to my house with his bag of supplies and tools and we got started one cold New Hampshire March day. I discovered quickly you need a soldering iron with a fine tip and these old eyes of mine needed one of those great magnifying glass light fixtures that have a built-in light.

I’ve soldered thousands of copper tubing joints being a master plumber, but never have I soldered tiny capacitors, transistors and crystals to a small circuit board. I was nervous, but Hanz demonstrated the technique. Remember above where I said you need an Elmer? I’m telling you to find someone who has done this before to save you lots of agony and frustration.

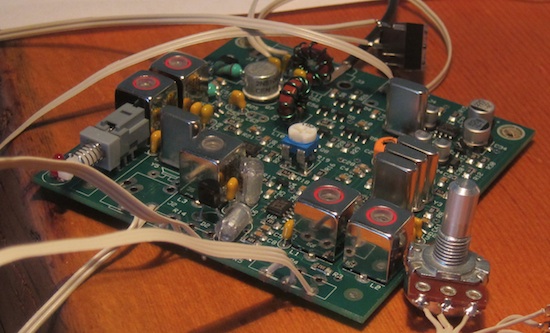
Wait until you wind a toroid or two. A toroid looks like a small round life preserver but it has wire carefully wrapped around the ring. It was fun to build these components, especially scrapping off the plastic from the wire leads and then tinning them.

Are you starting to get excited yet? You’re going to LOVE building your radio, I can feel the excitement building in you now!

tims20mboard

Here’s the circuit board for my QRP rig. See the toroids? They have the green wire wrappings looping through the brown core. Photo credit: Tim Carter – W3ATB

The written instructions I printed out from MFJ telling you what to do are wonderful, but there are tips you can only get from someone who has built a radio. Find that person, go to an online forum, ask for help from the MFJ people – they’ll probably connect you with an Elmer.

Above all, I suggest you find some old circuit board, or maybe MFJ sells a practice kit! Buy some cheap capacitors or transistors and take the time and practice soldering on a board you can throw away.

You want to solder about twenty components and get comfortable with the process before you attempt to solder on your actual kit board. Do this. Figure out a way to practice on a circuit board you’ll NOT use.

The other tools you’ll need to succeed are a special snippers that trim the wires from the back of the circuit board, a small multi-tester, the soldering iron with a fine tip, very thin solder with rosin core – get .022 or up to .031 diameter.

You’ll need some other small hand tools, but that’s about it.

If you decide to build the MFJ radio using their steel case, you may be able to build the radio in about eight hours. It’s all a function of how fast you can solder and be accurate.

Building the radio is just the first step. After it’s complete, you need to tune and adjust the tiny rig. Believe me, my eyes were twirling around in their sockets when it was time to do this. Unless you have a strong electronics background, you’ll need an Elmer to help you with this.

Are you backing away from this project because it seems too hard? Don’t. Don’t back away. I have to tell you when Hanz and I powered up my little rig with the circuit board just on my desk and we heard incoming signals, it was music to my ears!

I had done it! I had successfully wound toroids, I had soldered very small capacitors, and it all worked!

Go ahead, order your kit today and then find that Elmer who’ll hold your hand. I can’t wait to get more experience so I can help someone else build their first little QRP rig.

Did this blog post help you?

I invest time writing and taping videos to help other hams like you save time and lower their blood pressure. Frequently equipment manuals are lacking key details that cause frustration. I’m trying to fill in those gaps when I can.

If this post saved you some frustration, I’d appreciate it if you’d consider making a simple donation – even just a buck – using the PayPal button below. The more donations I receive, the more time I can devote to helping you.

Thanks in advance.


Learning Morse Code – Part Three


None of us can remember when we were babies. Think about that. How did you learn to talk when you were a toddler?

Toddlers learn to talk – communicate – by LISTENING to those around them TALK and equating those sounds to objects, feelings, smells, and ????.

There’s no piece of paper. You can be blind and learn to talk.

Remember my Roger story in Part One? Back in the 1960’s, the Boy Scout way of learning Morse code was WRONG. You LOOKED at a piece of paper that had the alphabet on it and next to each letter were dots (di’s) and dashes (dah’s). The paper caused your brain to add an extra step in the learning process that slowed you down and caused confusion in many cases.

Forget about the Boy Scout method. You’re going to learn Morse code the way toddlers learn to TALK. You’re going to just HEAR the distinct letters in Morse code and your brain is going to equate them with LETTERS, NUMBERS and PUNCTUATION marks.

You’re smart enough to put these together since you can read and write. Here’s an example. I’ll have a video in this spot very soon. But for now, close your eyes and have someone else read just the LETTERS (not words) below. Make sure you tell them to create a pause or some SPACE between the groups of letters below:

I AM HUNGRY  WHEN DO WE EAT DINNER?

So your brain was able to understand that pretty easily if the person reading it did it slow enough and created the pauses between the words. The question mark doesn’t come out when you speak each letter, because in normal speech we inflect our voice to create that. The word WHEN is also a clue it’s a question.

Now have your friend try this:

CQ CQ CQ FROM W3ATB W3ATB  K

That’s what a person sends in Morse code if they want to start a conversation with someone else.

The Koch Method

I learned Morse code by doing the Koch Method. It’s all auditory. This means you hear the sound and map it in your brain.

It’s recommended you learn the Koch Method at a speed you intend to operate. Shoot for 10 words a minute. I had all sorts of frustration trying it higher than that. You may be a better auditory learner than me.

Whatever you do, DON’T put pressure on yourself. I’m guessing you’re doing Morse code for fun and pleasure. If so, there are many many CW operators out there like you that WILL SLOW DOWN for you to have a QSO. You don’t have to be a speed demon to do CW.

In fact, the pros will tell you that accuracy of sending code is far more important than speed. If an operator goes too fast, they’ll bunch all the words or letters together and you’ll be confused trying to listen. Remember that fast-talker guy for the first FedEx TV commercials years ago?

The Koch Method employs a series of forty lessons starting first with the letters K and M. This training tool can be downloaded into a computer or onto a smart phone as an app.

I purchased the Koch Trainer App by Pignology for my smart phone because I’m a Mac guy and the software for computers is for PCs.

There’s another app called the Morse Trainer and there’s one called Koch Morse Trainer Pro.

These are not hard to use. Fire it up and just march through the lessons.

It’s very easy to hear the difference between K and M. Listen for yourself:

INSERT VIDEO of LESSON ONE

Once you master the letters K and M, you then advance to lesson two. The software adds a new letter. You keep doing this until you get through all the letters of the alphabet, the numbers 1 through 0 and then some important punctuation marks.

Did this blog post help you?

I invest time writing and taping videos to help other hams like you save time and lower their blood pressure. Frequently equipment manuals are lacking key details that cause frustration. I’m trying to fill in those gaps when I can.

If this post saved you some frustration, I’d appreciate it if you’d consider making a simple donation – even just a buck – using the PayPal button below. The more donations I receive, the more time I can devote to helping you.

Thanks in advance.


Learning Morse Code – Part Two


Are you ready to jump in? What’s the first thing you need to do to become proficient at Morse code?

Well, the first thing is attitude. We discussed that in Part One. You must have the right attitude. You must develop the passion to learn.

Did you see the movie Patton with George C. Scott? It came out in 1971. My dad loved that movie. He was a medic in WW II serving in General Bradley’s army alongside Patton’s men.

There’s a part of the opening speech in the Patton movie that fits right about now. It’s a little graphic, but it answers the question you may have about not knowing what to do when it comes to learning Morse code and making your first QSO.

As an adult you’re ego gets in the way. You don’t want to look bad in front of others. Small children don’t have egos. That’s why they jump into new things.

As an adult you erase fear and minimize ego barriers by knowing what to do when. The reason the young soldiers General Patton was talking to were nervous is because they had yet to experience what they were up against.

You feel that same fear about your first QSO. I know – I did too!

I recommend you listen to the entire speech, as it will help you hone your attitude about learning Morse code. But the part I want you to listen to starts at 2:43 into the video below.

I’ll apologize in advance, as the language and descriptions in the video are graphic. When George C. Scott says, ” … you’ll know what to do.”, you can stop the video.

What does this have to do with Morse code? You making your first QSO?

Everything.

If you STOP NOW and LEARN the letters, numbers and some of the punctuation, THEN you’ll KNOW WHAT TO DO.

I know this seems very basic, but a few people just want to jump in and get going. They want to get on the air. If this is you, slow down.

Let’s go to Part Three now. I’m going to show you how to learn the entire alphabet in just two weeks.

Did this blog post help you?

I invest time writing and taping videos to help other hams like you save time and lower their blood pressure. Frequently equipment manuals are lacking key details that cause frustration. I’m trying to fill in those gaps when I can.

If this post saved you some frustration, I’d appreciate it if you’d consider making a simple donation – even just a buck – using the PayPal button below. The more donations I receive, the more time I can devote to helping you.

Thanks in advance.


M0UAL – My First European QSO


It was bound to happen. My zepp dipole antenna is oriented so it sends a strong signal to the northeast. Northeast of me is 2500 miles of Atlantic Ocean.

This afternoon I sent CQ CQ CQ DE W3ATB W3ATB and who came back?

Alasdair Campbell, M0UAL !

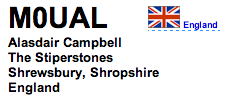
This is Alasdair's address from QRZ.com. It's a great resource allowing me to send him a QSL card.

This is Alasdair’s address from QRZ.com. It’s a great resource allowing me to send him a QSL card.

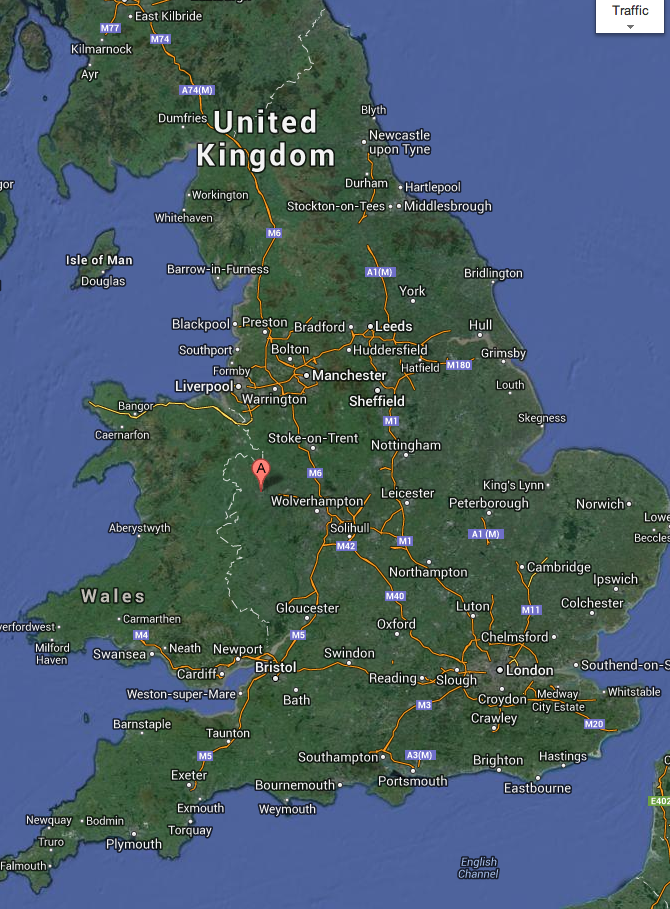
He lives in Shrewsbury, Shropshire UK. Look closely at his address. Tell me that’s not super cool! No street address – just “The Stiperstones”. What’s that? Wouldn’t you love to know?

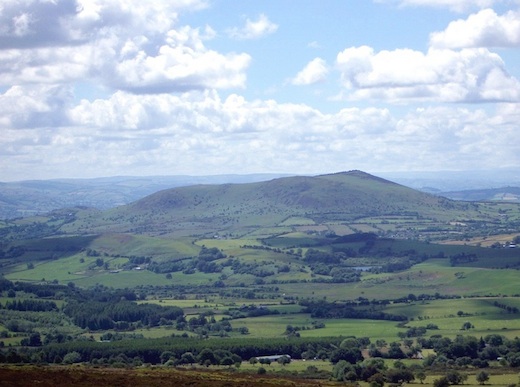
Well, the Stiperstones is a craggy jagged hill that’s quite famous in western England. At first when I saw Alasdair’s address, I thought it might be some large estate by that name.

Shrewsbury is about 150 miles northwest of London and about 15 miles east of Wales. He lives in the countryside and it’s beautiful.

This is what it looks like just above Alasdair's house. Wow!

This is what it looks like just above Alasdair’s house. Wow!

Alasdair told me the weather there today was cool and dry. I was having some trouble hearing him because another station was stepping on his signal. That happens by accident because another operator may not hear Alasdair or me doing our conversation.

Suffice it to say I was pretty excited!

The red balloon is where his town is located. Thanks Alasdair for answering my call. You were infinitely patient with me.

The red balloon is X marks the spot!

The red balloon is X marks the spot!

Did this blog post help you?

I invest time writing and taping videos to help other hams like you save time and lower their blood pressure. Frequently equipment manuals are lacking key details that cause frustration. I’m trying to fill in those gaps when I can.

If this post saved you some frustration, I’d appreciate it if you’d consider making a simple donation – even just a buck – using the PayPal button below. The more donations I receive, the more time I can devote to helping you.

Thanks in advance.


Elecraft KX3 Transceiver and W1PID


“Tim, look at this. It’s tinder fungus. Do you know what that is?”

My Morse code mentor and good friend Jim Cluett, W1PID, was pointing to crescent-shaped growths on the outside of a 12-inch diameter birch tree.

He and I had just spent a few minutes admiring the tall waterfalls on my 90 acres of woods in central New Hampshire. We were taking a hike and planning to operate his fancy Elecraft KX3 portable transceiver. This rig is magic in a box.

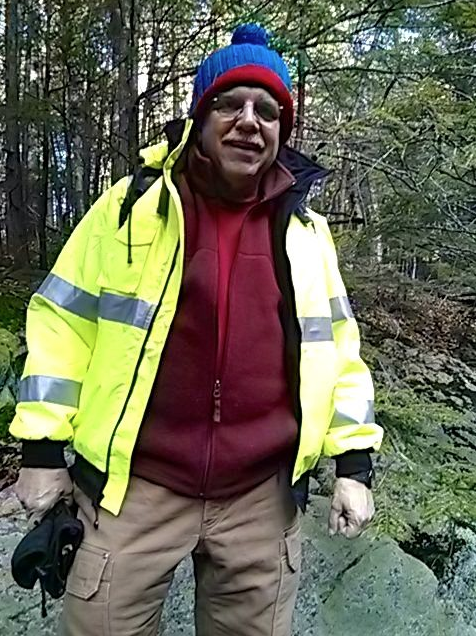
“I have no clue. I’ve never heard of that stuff,” I replied while adjusting my bright red and  blue knit hat. I was a walking beacon in the woods wearing my lime-green Milwaukee heated jacket and soft knitted hat. It was hunting season in New Hampshire and I didn’t want to be mistaken for a burly brown buck.

While my heated jacket was equipped with a 12-volt lithium-ion battery, I soon discovered walking was all I needed to keep warm. Minutes into the hike I had opened my jacket to stay comfortable.

The jacket is much brighter than it appears here. Hiking in the brisk weather was invigorating. Photo credit: Jim Cluett, W1PID

The jacket is much brighter than it appears here. Hiking in the brisk weather was invigorating. Photo credit: Jim Cluett, W1PID


“Well, it’s great stuff to use in a fire piston. Do you know what that is?”


“Fire piston? What in the world is that?”


Spending an afternoon with Jim I was discovering was not much different than what Bilbo Baggins must have experienced as he and Gandalf walked together towards the Misty Mountains.

Jim even looked the part of Gandalf with his beaver-chiseled walking stick given to him by his daughter. She had plucked it from a beaver dam a few years before and thought it would be a grand gift for her dad. Based on the silky smooth surface of the upper part of the shaft I was certain it was a cherished heirloom. The branch was polished by Jim’s hand having walked countless miles with it.

“A fire piston is a clever device you use in the wild to make a fire. It works like a diesel engine using compression to create high temperatures that ignite a small piece of the fungus. You then take that little ember and use it to start a fire,” expounded Jim.

This is where we eventually set up to operate. It looks misty in the photo, but it wasn't. Photo credit: Tim Carter, W3ATB

This is where we eventually set up to operate. It looks misty in the photo, but it wasn’t. Photo credit: Tim Carter, W3ATB

What else was I going to discover this late fall day? It was mostly sunny, but brisk. A weather system was bearing down on us from central Canada promising to usher in the first measurable snow of the season and quite cold temperatures. The forecast low for the upcoming night was 18 F. Mother Nature didn’t disappoint as I discovered the next day.

Jim and I were trying to take advantage of one of the final great hiking days of the season. I was the leader and Jim said it was my adventure. He was following me wherever I wanted to go. My thought was to take him to see two of the three major cascades along Blake Brook and then head up to higher ground to operate CW on his tiny multi-band radio.

I had been waiting for this day for months. Jim routinely hikes outdoors taking his small radio with him. Just as the radio is multi-band stretching from 160-6 meters, Jim operates CW in the field for both enjoyment and to hone his skills if there’s an emergency. Each time he slings his water bottle 40 feet in the air to snag a branch for his thin wire antenna, he’s multi-tasking. He wants to be able to operate in the field no matter what the weather conditions might be. It’s what you’d expect from a pro.

Just a week before he told me on the phone, “Tim, the KX3 only draws 150 mA in the receive mode. When transmitting on low power, it uses very little energy. You can operate for hours in the field if need be with this rig. Your ICOM-7000 draws 2 amps in receive. You’ll be packing a big battery with you if you want to operate.”

After viewing a second waterfalls and round pothole drilled into the bedrock  by swirling waters and gravel at the base of the falls, it was time to head back towards the warm sunny field where we’d set up his rig to see who was on the air.

“You know one of the things I love about operating in the field?” Jim exclaimed as we we hiked up away from the falls and through the forest.

“I often wonder if I’m the first person to ever operate a portable radio from that exact place in the world.”

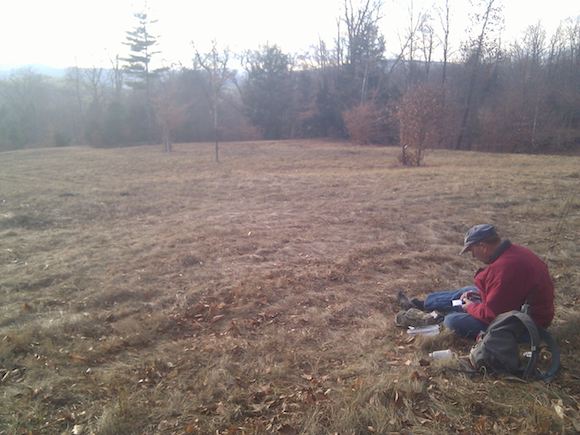
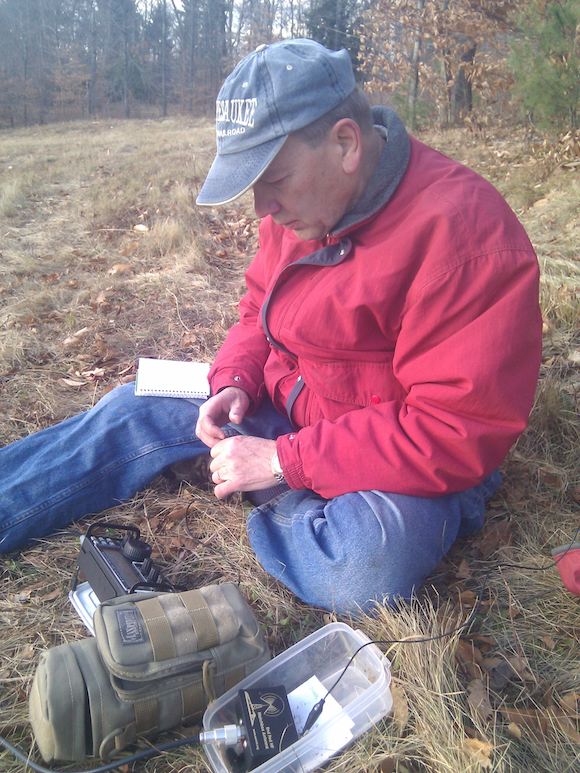
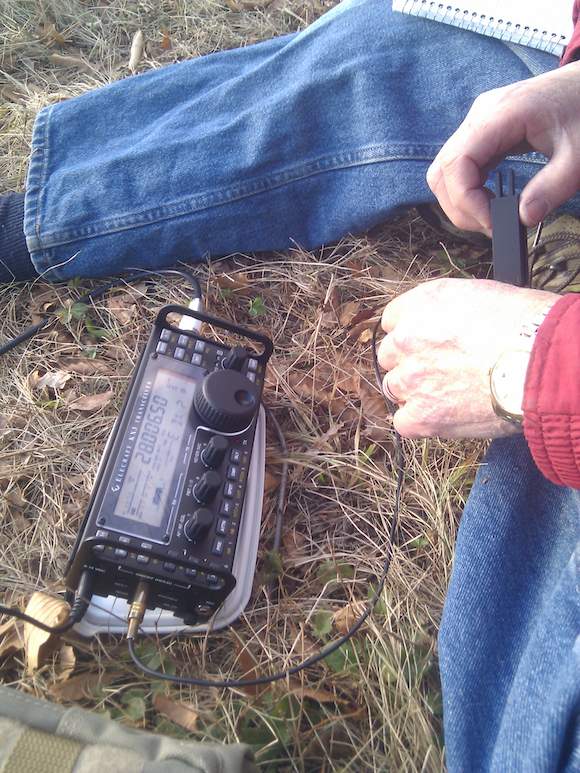
Here's Jim operating a tiny iambic paddle to send the characteristic di's and dah's that are part of a CW signal. Photo credit: Tim Carter, W3ATB

Here’s Jim operating a tiny iambic paddle to send the characteristic di’s and dah’s that are part of a CW signal. Photo credit: Tim Carter, W3ATB

“Well, I have to believe that’s the case today. I can tell you I’ve never had the chance to operate a HF radio on this property. My guess is no one else ever has either.”

About thirty minutes later Jim and I saw the freshly cut brown grass laying flat in the large field as we cut sideways across the sloping leaf covered forest floor. Our footfalls crushed the dry leaves making a wonderful crunching noise.

The open south-facing field would make a perfect place to capture some of the invisible radio waves that were bouncing all around us. We weren’t going to be denied. Fortunately it was mostly sunny with puffy white clouds racing across the sky in advance of the cold front.

Jim took off his compact backpack. Inside was everything he needed to communicate with people all over the globe. The radio and battery fit inside a small tubular canvas carrying case and all the other things he required were inside a translucent plastic case you’d store leftover food.

It only took a few minutes of setup to be on the air. Within 15 minutes Jim had gathered four contacts on 10, 15 and 20 meters. There was a world-wide CQ contest running clogging many of the bands, so QSOs were fast sharing just the most basic information.

For the past nine months I’ve been in awe of Jim’s CW skills. He’s been doing CW for over 50 years so you’d expect him to be have great skills and magic when using this method of communication.

As he operated, I would lean in to look at the amazing Elecraft portable radio. I’d seen photos of it in many of the stories he’d written about his outdoor radio adventures, but had never seen it in operation.

Here it is, the superb Elecraft KX3. Look closely at the lower right corner of the LED screen. Photo credit: Tim Carter, W3ATB

Here it is, the superb Elecraft KX3. Look closely at the lower right corner of the LCD screen. Photo credit: Tim Carter, W3ATB

“These handles on the side I bought from another guy. When you put on the clear plastic cover, they work well to protect the radio knobs from damage as you transport the rig.” Jim was right.

As the sun sank in the sky, it went behind a giant evergreen tree placing us in a shadow. It didn’t take long at all before we started to get cold. Jim was trying to make his last contact and I was looking at the large LCD screen that showed all sorts of data.

I could see the SWR meter moving about but something else caught my eye in the lower right corner. Why were those letters moving across the screen? Wait a minute, didn’t I see PID there and something else scrolling from right to left much like you see the newsfeed crawl when watching cable TV news or the weather?

“Hey, this radio is translating the Morse code for you!” My eyes were bigger than silver dollars.

An impish grin formed on Jim’s face and I believe he uttered, “Oh, I don’t look at that. I guess I should have turned that off. You don’t think I need that after 50 years of doing CW do you?”

No, Jim I don’t. But we’ll never know, will we?

Too bad you can’t see the grin on my face as I type this.

 
Did this blog post help you?

I invest time writing and taping videos to help other hams like you save time and lower their blood pressure. Frequently equipment manuals are lacking key details that cause frustration. I’m trying to fill in those gaps when I can.

If this post saved you some frustration, I’d appreciate it if you’d consider making a simple donation – even just a buck – using the PayPal button below. The more donations I receive, the more time I can devote to helping you.

Thanks in advance.