CAVEAT: This is not going to be a huge step-by-step article telling you the process I went through to build the MFJ QRP Cub 20-meter transceiver. It’s an article I decided to write to help bolster your confidence to start and finish this project.
If you’ve never been around electronics – that’s me – and your eyes glaze over looking at all the tiny components of different shapes, sizes and colors on a green circuit board, then you’ll keep reading. I was terrified of even thinking of working with electronics.
But guess what? I did it! I have a working MFJ QRP Cub 20-meter transceiver! But here’s the news: I didn’t do it alone. Nor should you the first time if you’ve never built any electronics.
What’s QRP you ask? It’s a q-signal used in amateur radio to communicate that one should reduce power. There’s an entire branch of amateur radio that desires to communicate around the world using LOW POWER – 5 watts or less. I’m part of that group and these tiny radios by MFJ or other manufacturers are just that. They’re designed to operate on LOW POWER.
I don’t know what got you interested in building your own radio, but for me it was seeing a Morse code demonstration given by two seasoned operators in front of a group of young Boy Scouts. I was intrigued by the Morse code, but MUCH MORE SO by the radio they were using.
It was an MFJ QRP rig that looked like it was used as a prop on the Star Wars or some other modern space-age science fiction movie.
It was the COOLEST RADIO I’d ever seen. This radio was in a clear plastic waterproof box and was completely self-contained. The battery was built in. The touch keyer was built in – two tiny acorn nuts on the lower outside corner of the box!
The cool LCD frequency display was built in. All you had to do to operate was open the lid, connect your antenna and flip the tiny on/off switch.
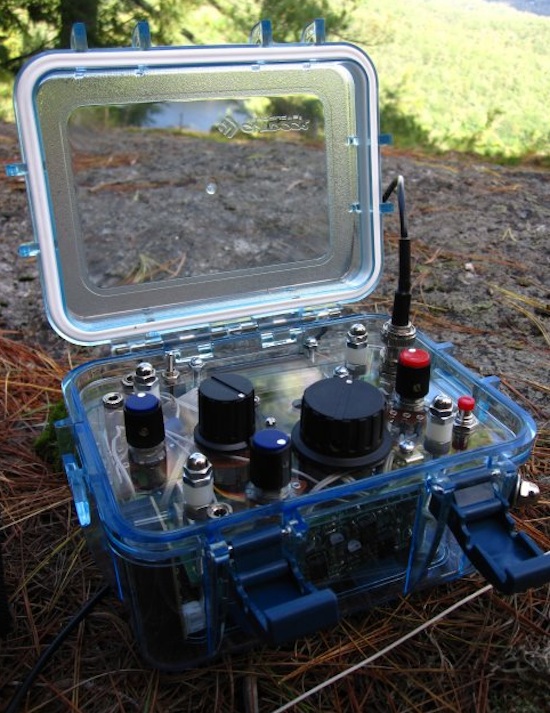
Here it is. This is the radio Hanz Busch built using the MFJ QRP Cub Transceiver. This particular radio was for 80 meters, not 20. The circuit boards, I believe, are nearly identical. Photo credit: Hanz Busch, W1JSB
All I could think of in that room is, “I WANT ONE OF THOSE RADIOS AND I WANT TO LEARN MORSE CODE!!!”
That was my inspiration to build a radio from scratch. First and foremost, you need some internal passion driving this project or it will languish on your bench. You’ll give up. Tap into that passion now.
Jim Cluett – W1PID and Hanz Busch – W1JSB
I was lucky. You need to find your luck via an Elmer. Jim Cluett – W1PID is my Morse code mentor. He’s a member of the same club I belong to – Central New Hampshire Amateur Radio Club.
He’s also built countless radios over his 50 years in the hobby. I’ve only been really active in amateur radio the past 30 months – and most of that is in public service work. Read some of the other stories here on my blog about that including the one about me working at the Boston Marathon the day the two terrorist brother bombers killed and maimed many.
The day after the demonstration in front of the Boy Scouts I called Jim.
“Jim, I really want to build one of those radios I saw last night. I also want to learn Morse code. What’s the next step?”
“Contact Hanz. He’ll help you build the rig. Start practicing code 10 minutes a day using the Koch Method.”
Jim’s very stingy with his words, but not his wisdom. He’s as good a mentor as you’ll ever find. Jim Cluett is selfless. We need millions more Jim Cluett’s in this world.
I reached out to Hanz Busch – W1JSB and he said he’d help me build a radio just like his. Jim suggested I go with a 20-meter rig because that band is very open in the daytime and I’d be using the QRP rig out in the field on hikes to make QSOs. You can use the rig you build inside your warm and dry home, but my desire is to use it hiking and doing SOTA contacts.
Soldering Irons and Toroids
I went to MFJ Enterprises and purchased the MFJ-9320K kit radio for 20 meters. When it arrived, it was like Christmas morning. I really had no idea about what was in the kit, especially the SIZE.
It was SMALL! The little metal case they provide to house the radio was about three inches square and two inches high! That’s pretty tiny.
Hanz came over to my house with his bag of supplies and tools and we got started one cold New Hampshire March day. I discovered quickly you need a soldering iron with a fine tip and these old eyes of mine needed one of those great magnifying glass light fixtures that have a built-in light.
I’ve soldered thousands of copper tubing joints being a master plumber, but never have I soldered tiny capacitors, transistors and crystals to a small circuit board. I was nervous, but Hanz demonstrated the technique. Remember above where I said you need an Elmer? I’m telling you to find someone who has done this before to save you lots of agony and frustration.
Wait until you wind a toroid or two. A toroid looks like a small round life preserver but it has wire carefully wrapped around the ring. It was fun to build these components, especially scrapping off the plastic from the wire leads and then tinning them.
Are you starting to get excited yet? You’re going to LOVE building your radio, I can feel the excitement building in you now!
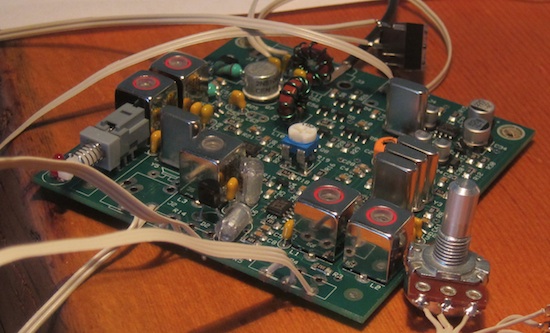
Here’s the circuit board for my QRP rig. See the toroids? They have the green wire wrappings looping through the brown core. Photo credit: Tim Carter – W3ATB
The written instructions I printed out from MFJ telling you what to do are wonderful, but there are tips you can only get from someone who has built a radio. Find that person, go to an online forum, ask for help from the MFJ people – they’ll probably connect you with an Elmer.
Above all, I suggest you find some old circuit board, or maybe MFJ sells a practice kit! Buy some cheap capacitors or transistors and take the time and practice soldering on a board you can throw away.
You want to solder about twenty components and get comfortable with the process before you attempt to solder on your actual kit board. Do this. Figure out a way to practice on a circuit board you’ll NOT use.
The other tools you’ll need to succeed are a special snippers that trim the wires from the back of the circuit board, a small multi-tester, the soldering iron with a fine tip, very thin solder with rosin core – get .022 or up to .031 diameter.
You’ll need some other small hand tools, but that’s about it.
If you decide to build the MFJ radio using their steel case, you may be able to build the radio in about eight hours. It’s all a function of how fast you can solder and be accurate.
Building the radio is just the first step. After it’s complete, you need to tune and adjust the tiny rig. Believe me, my eyes were twirling around in their sockets when it was time to do this. Unless you have a strong electronics background, you’ll need an Elmer to help you with this.
Are you backing away from this project because it seems too hard? Don’t. Don’t back away. I have to tell you when Hanz and I powered up my little rig with the circuit board just on my desk and we heard incoming signals, it was music to my ears!
I had done it! I had successfully wound toroids, I had soldered very small capacitors, and it all worked!
Go ahead, order your kit today and then find that Elmer who’ll hold your hand. I can’t wait to get more experience so I can help someone else build their first little QRP rig.
Did this blog post help you?
I invest time writing and taping videos to help other hams like you save time and lower their blood pressure. Frequently equipment manuals are lacking key details that cause frustration. I’m trying to fill in those gaps when I can.
If this post saved you some frustration, I’d appreciate it if you’d consider making a simple donation – even just a buck – using the PayPal button below. The more donations I receive, the more time I can devote to helping you.
Thanks in advance.